In-app messages (Android)
Learn how to configure, customize, and test in-app messages in your Android app using the Blueshift SDK.
This guide explains how to display contextual in-app messages within your app.
Prerequisites
Before setting up in-app messages, ensure you have completed:
- Set up Blueshift Android SDK
- Push notifications - includes:
- Push adapter configuration (required for silent push triggers)
Set up in-app messages
Enable in-app messages
In your Application class's onCreate() method (e.g., MyApplication.kt), add these lines to your Configuration object before calling initialize():
val configuration = Configuration()
configuration.isInAppEnabled = true
// Enable JavaScript for HTML in-app messages
configuration.isJavaScriptForInAppWebViewEnabled = true
Configuration configuration = new Configuration();
configuration.setInAppEnabled(true);
// Enable JavaScript for HTML in-app messages
configuration.setJavaScriptForInAppWebViewEnabled(true);
Register activities for in-app display
In-app messages display on registered activities. Choose one of the following methods:
Method 1: Register individual activities
In each activity where you want to show in-app messages (e.g., MainActivity.kt, ProductActivity.kt), add this line inside the onCreate() method after setContentView():
// Add this line in your activity's onCreate() method after setContentView()
Blueshift.getInstance(this).registerForInAppMessages(this)
// Add this line in your activity's onCreate() method after setContentView()
Blueshift.getInstance(this).registerForInAppMessages(this);
The screen name will be the activity's fully qualified class name (e.g., com.example.app.MainActivity).
Method 2: Register with a custom screen name
Useful for fragments or custom naming. Add this line in your activity's onCreate() method after setContentView():
// Register with custom screen name
Blueshift.getInstance(this).registerForInAppMessages(this, "custom_screen_name")
// Register with custom screen name
Blueshift.getInstance(this).registerForInAppMessages(this, "custom_screen_name");
Replace the custom_screen_name with your desired screen identifier.
Method 3: Auto-register all activities
In your Application class (e.g., MyApplication.kt), implement ActivityLifecycleCallbacks to automatically register all activities. Add the following to your existing Application class:
import android.app.Application
import android.app.Activity
import android.os.Bundle
import com.blueshift.Blueshift
import com.blueshift.model.Configuration

class MyApplication : Application(), Application.ActivityLifecycleCallbacks {

    override fun onCreate() {
        super.onCreate()

        // Your existing SDK initialization code
        val configuration = Configuration()
        configuration.setApiKey("YOUR_API_KEY")
        configuration.setAppIcon(R.mipmap.ic_launcher)
        configuration.isInAppEnabled = true
        Blueshift.getInstance(this).initialize(configuration)

        // Register lifecycle callbacks for automatic in-app registration
        registerActivityLifecycleCallbacks(this)
    }

    override fun onActivityStarted(activity: Activity) {
        Blueshift.getInstance(activity).registerForInAppMessages(activity)
    }

    override fun onActivityStopped(activity: Activity) {
        Blueshift.getInstance(activity).unregisterForInAppMessages(activity)
    }

    // Required empty implementations
    override fun onActivityCreated(activity: Activity, savedInstanceState: Bundle?) {}
    override fun onActivityResumed(activity: Activity) {}
    override fun onActivityPaused(activity: Activity) {}
    override fun onActivitySaveInstanceState(activity: Activity, outState: Bundle) {}
    override fun onActivityDestroyed(activity: Activity) {}
}
import android.app.Application;
import android.app.Activity;
import android.os.Bundle;
import androidx.annotation.NonNull;
import androidx.annotation.Nullable;
import com.blueshift.Blueshift;
import com.blueshift.model.Configuration;

public class MyApplication extends Application implements Application.ActivityLifecycleCallbacks {

    @Override
    public void onCreate() {
        super.onCreate();

        // Your existing SDK initialization code
        Configuration configuration = new Configuration();
        configuration.setApiKey("YOUR_API_KEY");
        configuration.setAppIcon(R.mipmap.ic_launcher);
        configuration.setInAppEnabled(true);
        Blueshift.getInstance(this).initialize(configuration);

        // Register lifecycle callbacks for automatic in-app registration
        registerActivityLifecycleCallbacks(this);
    }

    @Override
    public void onActivityStarted(@NonNull Activity activity) {
        Blueshift.getInstance(activity).registerForInAppMessages(activity);
    }

    @Override
    public void onActivityStopped(@NonNull Activity activity) {
        Blueshift.getInstance(activity).unregisterForInAppMessages(activity);
    }

    // Required empty implementations
    @Override
    public void onActivityCreated(@NonNull Activity activity, @Nullable Bundle savedInstanceState) {}
    @Override
    public void onActivityResumed(@NonNull Activity activity) {}
    @Override
    public void onActivityPaused(@NonNull Activity activity) {}
    @Override
    public void onActivitySaveInstanceState(@NonNull Activity activity, @NonNull Bundle outState) {}
    @Override
    public void onActivityDestroyed(@NonNull Activity activity) {}
}
Unregister activities (optional)
If you need to stop displaying in-app messages on a specific activity, add the unregister line to that activity's onDestroy() method. For example, in MainActivity.kt or any other activity file where you registered for in-app messages:
override fun onDestroy() {
    // Unregister before destroying the activity
    Blueshift.getInstance(this).unregisterForInAppMessages(this)
    super.onDestroy()
}
@Override
protected void onDestroy() {
    // Unregister before destroying the activity
    Blueshift.getInstance(this).unregisterForInAppMessages(this);
    super.onDestroy();
}
Jetpack Compose support
The Blueshift Android SDK supports Jetpack Compose natively for displaying in-app messages. This lets you integrate in-app messaging into Compose-based apps without requiring Activity manipulation or ComposeView overlays.
1. Update dependency
Replace your existing Blueshift dependency with the Compose-enabled version:
dependencies {
    implementation 'com.blueshift:android-sdk-compose:4.2.0'
}
2. Enable Compose support
Add Compose support during SDK initialization:
val configuration = Configuration()
configuration.apiKey = "YOUR_API_KEY"
configuration.addCompose() // Enable Compose support
// ... other configuration options
Blueshift.initialize(this, configuration)
3. Register screens for in-app messages
Add the BlueShiftInApp composable to screens where you want to display in-app messages.
Option A: Register specific screens
@Composable
fun HomeScreen() {
    BlueShiftInApp("home") // Register this screen for in-app messages
    Column {
        Text("Welcome to Home Screen")
        // Your screen content
    }
}

@Composable
fun ProfileScreen() {
    BlueShiftInApp("profile") // Register this screen for in-app messages
    Column {
        Text("User Profile")
        // Your screen content
    }
}
Option B: Register app-wide
Add BlueShiftInApp() to your main navigation composable for in-app message support across the entire app:
@Composable
fun AppNavigation() {
    BlueShiftInApp() // Register for in-app messages across the entire app
    NavHost(
        navController = navController,
        startDestination = "home"
    ) {
        composable("home") { HomeScreen() }
        composable("profile") { ProfileScreen() }
        // ... other destinations
    }
}
Only the currently visible screen with
BlueShiftInApp()will receive in-app messages. When a new screen registers, the previous screen is automatically unregistered.
Migrate from the View-based implementation
If you're migrating from the traditional View-based setup:
- Remove existing
Blueshift.getInstance(activity).registerForInAppMessages(activity)andBlueshift.getInstance(activity).unregisterForInAppMessages(activity)calls. - Replace with
BlueShiftInApp()composable in your screens. - Update the dependency to
android-sdk-compose:4.2.0. - Add
configuration.addCompose()during SDK initialization.
Handle deep links
In-app messages can contain deep links to navigate users within your app. The SDK triggers a VIEW intent with the deep link URL. You can use either HTTPS deep links (Android App Links) or custom URL schemes, depending on your app's requirements.
Configure deep link handling
Step 1: Add intent filter to AndroidManifest.xml
Add this intent filter inside the <activity> tag of the activity that should handle deep links (typically your main activity or a dedicated deep link activity):
<activity
    android:name=".MainActivity"
    android:exported="true">

    <!-- Your existing intent filters -->

    <!-- Deep link intent filter for in-app messages -->
    <intent-filter
        android:autoVerify="true"
        tools:targetApi="m">
        <action android:name="android.intent.action.VIEW" />
        <category android:name="android.intent.category.DEFAULT" />
        <category android:name="android.intent.category.BROWSABLE" />

        <data android:scheme="https" />
        <data android:host="yourapp.com" />
    </intent-filter>
</activity>
Replace yourapp.com with your actual domain.
Step 2: Handle deep link in activity
In the activity specified in Step 1 (e.g., MainActivity.kt), add this code in the onCreate() method to handle the deep link:
import android.net.Uri

override fun onCreate(savedInstanceState: Bundle?) {
    super.onCreate(savedInstanceState)
    setContentView(R.layout.activity_main)

    // Handle deep link from in-app message
    val uri: Uri? = intent.data
    if (uri != null) {
        // Navigate to the appropriate screen based on the URI
        // Example: if (uri.path == "/product") { openProductScreen() }
    }
}
import android.net.Uri;

@Override
protected void onCreate(Bundle savedInstanceState) {
    super.onCreate(savedInstanceState);
    setContentView(R.layout.activity_main);

    // Handle deep link from in-app message
    Uri uri = getIntent().getData();
    if (uri != null) {
        // Navigate to the appropriate screen based on the URI
        // Example: if (uri.getPath().equals("/product")) { openProductScreen(); }
    }
}
Advanced
Manual trigger control
To manually control when to fetch and display in-app messages, enable manual mode in your Application class's onCreate() method during SDK initialization:
Enable manual mode:
val configuration = Configuration()
configuration.setApiKey("YOUR_API_KEY")
configuration.setAppIcon(R.mipmap.ic_launcher)
configuration.isInAppEnabled = true
// Enable manual trigger mode
configuration.isInAppManualTriggerEnabled = true

Blueshift.getInstance(this).initialize(configuration)
Configuration configuration = new Configuration();
configuration.setApiKey("YOUR_API_KEY");
configuration.setAppIcon(R.mipmap.ic_launcher);
configuration.setInAppEnabled(true);
// Enable manual trigger mode
configuration.setInAppManualTriggerEnabled(true);

Blueshift.getInstance(this).initialize(configuration);
When manual mode is enabled:
- SDK will not fetch messages on app start
- SDK will not automatically display messages
- Messages are fetched only when a silent push is received
- Messages display only when manually triggered
Manually fetch messages:
Call this method from your activity or fragment when you want to fetch in-app messages:
import com.blueshift.Blueshift
import com.blueshift.inappmessage.InAppApiCallback
import android.util.Log

Blueshift.getInstance(this).fetchInAppMessages(object : InAppApiCallback {
    override fun onSuccess() {
        Log.d("InApp", "Fetch success")
    }

    override fun onFailure(errorCode: Int, errorMessage: String) {
        Log.d("InApp", "Fetch failed: $errorMessage")
    }
})
import com.blueshift.Blueshift;
import com.blueshift.inappmessage.InAppApiCallback;
import android.util.Log;

Blueshift.getInstance(this).fetchInAppMessages(new InAppApiCallback() {
    @Override
    public void onSuccess() {
        Log.d("InApp", "Fetch success");
    }

    @Override
    public void onFailure(int errorCode, String errorMessage) {
        Log.d("InApp", "Fetch failed: " + errorMessage);
    }
});
Manually display messages:
Call this method from your activity when you want to display the fetched in-app messages:
Blueshift.getInstance(this).displayInAppMessages()
Blueshift.getInstance(this).displayInAppMessages();
Background fetch control
Control automatic fetching via silent push (available from SDK v3.1.1+) in your Application class's onCreate() method during SDK initialization:
val configuration = Configuration()
configuration.setApiKey("YOUR_API_KEY")
configuration.setAppIcon(R.mipmap.ic_launcher)
configuration.isInAppEnabled = true
// Control background fetch
configuration.isInAppBackgroundFetchEnabled = true

Blueshift.getInstance(this).initialize(configuration)
Configuration configuration = new Configuration();
configuration.setApiKey("YOUR_API_KEY");
configuration.setAppIcon(R.mipmap.ic_launcher);
configuration.setInAppEnabled(true);
// Control background fetch
configuration.setInAppBackgroundFetchEnabled(true);

Blueshift.getInstance(this).initialize(configuration);
Set to false to disable automatic fetching via silent push.
Display interval
Control time between consecutive in-app displays on the same screen (default: 60 seconds) in your Application class's onCreate() method during SDK initialization:
val configuration = Configuration()
configuration.setApiKey("YOUR_API_KEY")
configuration.setAppIcon(R.mipmap.ic_launcher)
configuration.isInAppEnabled = true
// Set display interval
configuration.inAppInterval = 120 // seconds

Blueshift.getInstance(this).initialize(configuration)
Configuration configuration = new Configuration();
configuration.setApiKey("YOUR_API_KEY");
configuration.setAppIcon(R.mipmap.ic_launcher);
configuration.setInAppEnabled(true);
// Set display interval
configuration.setInAppInterval(120); // seconds

Blueshift.getInstance(this).initialize(configuration);
Listen to in-app lifecycle events
Track delivery, open, and click events (available from SDK v3.1.9+). Add this listener to your Application class's onCreate() method after SDK initialization:
import com.blueshift.Blueshift
import com.blueshift.BlueshiftInAppListener
import android.util.Log

Blueshift.setBlueshiftInAppListener(object : BlueshiftInAppListener {
    override fun onInAppDelivered(inappMap: Map<String, Any>) {
        Log.d("InApp", "Delivered")
    }

    override fun onInAppOpened(inappMap: Map<String, Any>) {
        Log.d("InApp", "Opened")
    }

    override fun onInAppClicked(inappMap: Map<String, Any>) {
        Log.d("InApp", "Clicked")
    }
})
import com.blueshift.Blueshift;
import com.blueshift.BlueshiftInAppListener;
import android.util.Log;

Blueshift.setBlueshiftInAppListener(new BlueshiftInAppListener() {
    @Override
    public void onInAppDelivered(Map<String, Object> inappMap) {
        Log.d("InApp", "Delivered");
    }

    @Override
    public void onInAppOpened(Map<String, Object> inappMap) {
        Log.d("InApp", "Opened");
    }

    @Override
    public void onInAppClicked(Map<String, Object> inappMap) {
        Log.d("InApp", "Clicked");
    }
});
Test in-app messages
Get device ID
In MainActivity, add this code inside the onCreate() method:
import android.util.Log
import com.blueshift.util.DeviceUtils

val deviceId = DeviceUtils.getDeviceId(this)
Log.d("InAppTest", "Device ID: $deviceId")
import android.util.Log;
import com.blueshift.util.DeviceUtils;

String deviceId = DeviceUtils.getDeviceId(this);
Log.d("InAppTest", "Device ID: " + deviceId);
Run your app and search for InAppTest in Logcat. You'll see something like the following:
D/InAppTest: Device ID: eEzgZKd6QE-M0P5oHL-mWS:com.example.blueshiftsdktestCopy the Device ID.
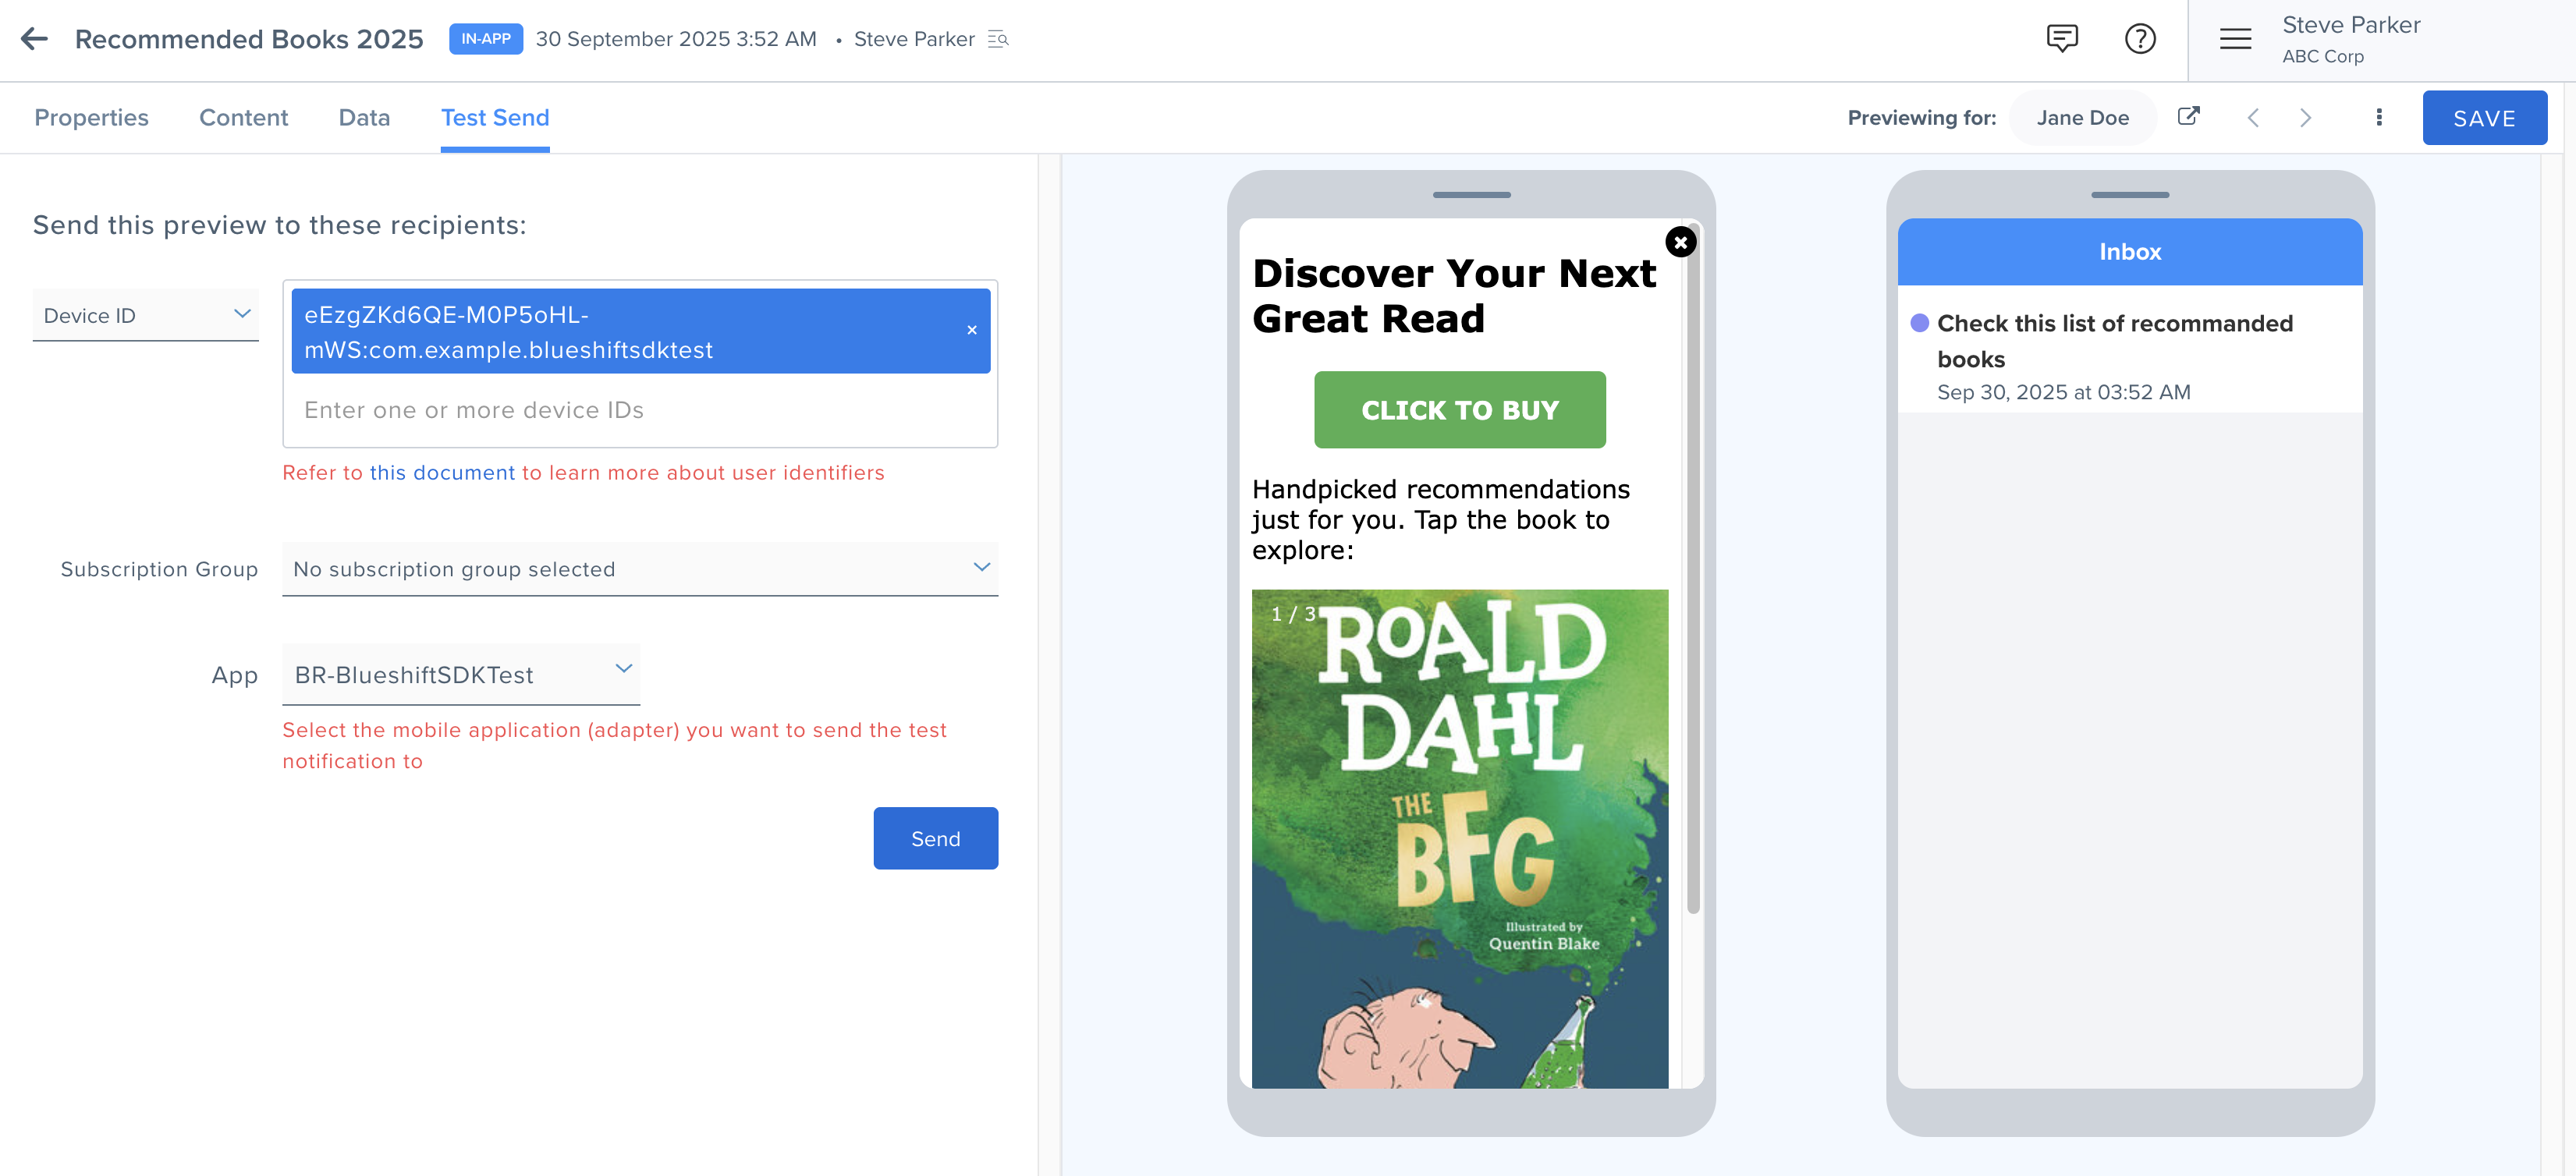
Send a test in-app message from Blueshift
- Go to In-App Studio in the Blueshift dashboard
- Create a new in-app notification or open an existing one
- Click the Test Send tab
- Enter the Device ID in the Device ID field
- Select the adapter from the App dropdown
- Click Send
Verify message display
The in-app message should appear on the registered activity. If you added the in-app listener in your Application class during setup, check Logcat for InAppTest:
D/InAppTest: Message delivered
D/InAppTest: Message opened
If the message doesn't appear:
- Check push notifications are configured (silent push required for triggering)
- Verify activity is registered for in-app messages
- Check device targeting in the dashboard
- Verify event name matches trigger condition
- Confirm notification permission granted (required for silent push on Android 13+)
Test deep links
Step 1: Add intent filter to AndroidManifest.xml
Add this inside your MainActivity's <activity> tag:
<intent-filter>
    <action android:name="android.intent.action.VIEW" />
    <category android:name="android.intent.category.DEFAULT" />
    <category android:name="android.intent.category.BROWSABLE" />

    <data android:scheme="yourapp" />
      </intent-filter>
Replace yourapp with your app's custom scheme.
Step 2: Add deep link handling to MainActivity
Add this in MainActivity's onCreate() method:
import android.net.Uri
import android.util.Log

val uri = intent.data
if (uri != null) {
    Log.d("InAppTest", "Deep link: $uri")
    Log.d("InAppTest", "Scheme: ${uri.scheme}")
    Log.d("InAppTest", "Host: ${uri.host}")
    Log.d("InAppTest", "Path: ${uri.path}")
}
import android.net.Uri;
import android.util.Log;

Uri uri = getIntent().getData();
if (uri != null) {
    Log.d("InAppTest", "Deep link: " + uri);
    Log.d("InAppTest", "Scheme: " + uri.getScheme());
    Log.d("InAppTest", "Host: " + uri.getHost());
    Log.d("InAppTest", "Path: " + uri.getPath());
}
Step 3: Add a deep link to the in-app message
In your in-app message template, add a link or button with your custom scheme (example: yourapp://product/123)
Step 4: Send test message
Use the Test Send tab to send the message to your device
Step 5: Tap the link
When the message appears, tap the link or button
Step 6: Check Logcat
Search for InAppTest in Logcat. You should see:
D/InAppTest: Deep link: yourapp://product/123
D/InAppTest: Scheme: yourapp
D/InAppTest: Host: product
D/InAppTest: Path: /123
If you see the deep link in the logs, your deep link handling is working correctly.
Reference documentation
For more information about in-app messages:
Updated 4 months ago