Integrate your React Native iOS app
This article provides information on how to install and set up set up Blueshift's iOS SDK and integrate your React Native app with our platform.
After adding the Blueshift plugin to your project, run pod install inside the iOS directory. The pod installs the Blueshift plugin along with the Blueshift iOS SDK in your iOS Project.
pod install post-processing
After updating the plugin to v1.2.0 and above, if you run into the below error after doing pod install, you will have to invoke a script to do post-pod install processing for Blueshift's iOS SDK.
Error - Signing for "BlueShift-iOS-SDK-BlueShift-iOS-SDK_BlueShift_iOS_SDK" requires a development team. Select a development team in the Signing & Capabilities editor.
To run the script, you have to call the Blueshift plugin function in your Podfile. First, import the Blueshift plugin's script in the Podfile.
require_relative '../node_modules/blueshift-react-native/post_install.rb'
Then call the Blueshift plugin function blueshift_sdk_post_install in the existing post-install processing code.
//Existing react native post install code from the podfile
post_install do |installer|
    react_native_post_install(installer)
    __apply_Xcode_12_5_M1_post_install_workaround(installer)
   //Call Blueshift function here
    blueshift_sdk_post_install(installer)
    end
Refer to this Blueshift React Native sample app podfile for more information.
Prerequisites
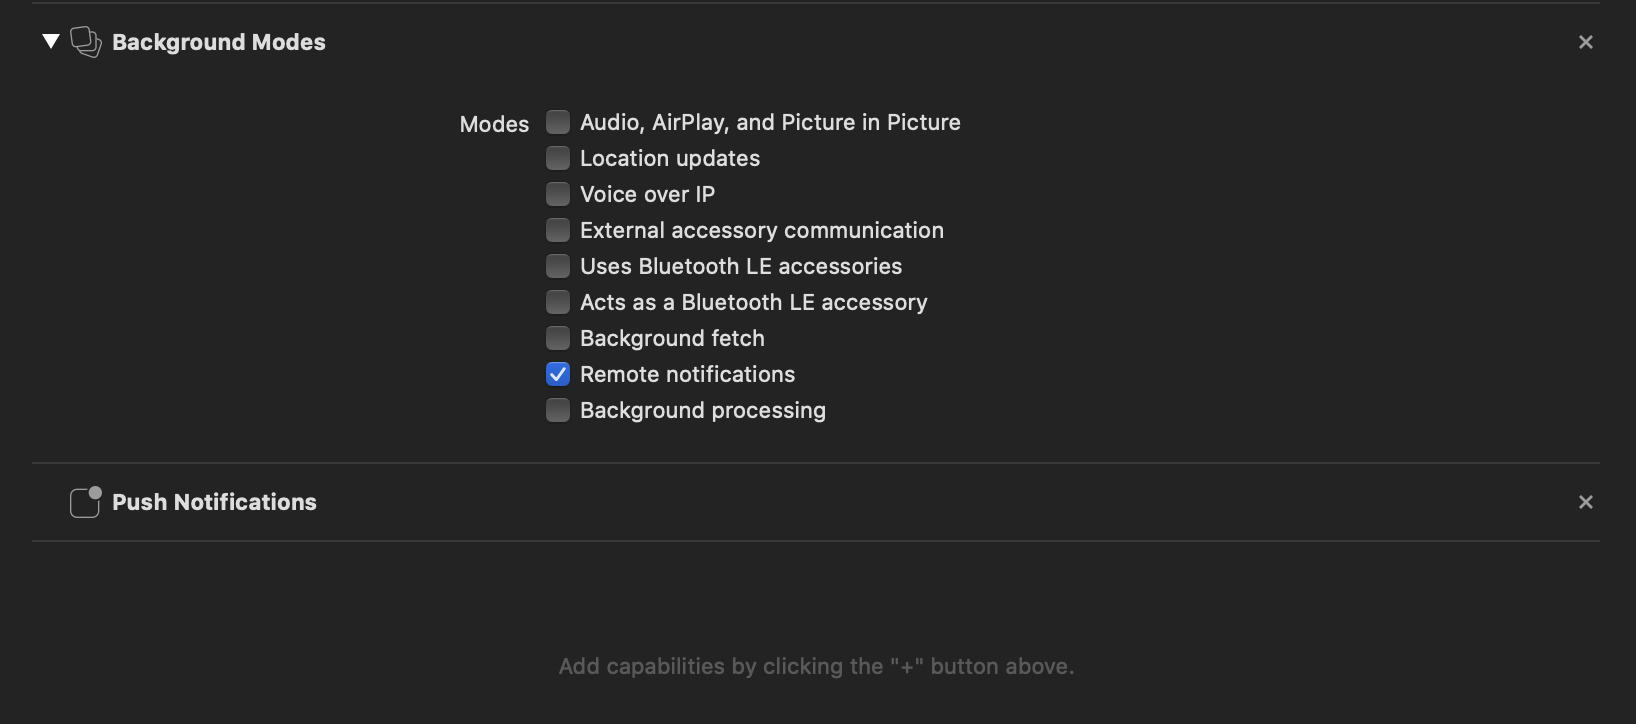
The following permissions must be enabled in your Xcode project to send push notifications to the user’s device.
- To send push notifications, add Push Notifications capability to your app target.
- To send silent push notifications, add Background modes capability to your App target and enable Remote notifications background mode for your app target.
After adding the Push Notifications capability and enabling Remote notifications background mode, it should look like this.
- If you want to send Time Sensitive Push Notifications, add the capability
Time Sensitive Notificationto your app target.
1. SDK integration
You can integrate Blueshift's React plugin for your iOS project using Automatic integration. After automatic integration, the Blueshift plugin handles device tokens, push notifications, and deep link callbacks.
Important!Automatic integration is not recommended if you are using Firebase SDK or any other SDK with auto integration along with Blueshift. The push notification and other OS callback methods conflict with each other, so in this case, you can use the manual way of SDK integration. Contact Blueshift's support team at [email protected] for any integration-related queries.
To integrate the SDK, complete the following steps:
Setup AppDelegate.h
- Include the plugin’s header
BlueshiftPluginManager.hin theAppDelegate.hfile of the app’s Xcode project. - Implement the
UNUserNotificationCenterDelegateprotocol onAppDelegateclass.
The AppDelegate.h file should look like this:
#import <React/RCTBridgeDelegate.h>
#import <UIKit/UIKit.h>

#import "BlueshiftPluginManager.h"

@interface AppDelegate : UIResponder <UIApplicationDelegate, RCTBridgeDelegate, UNUserNotificationCenterDelegate>

@property (nonatomic, strong) UIWindow *window;

@end
Setup AppDelegate.m
Now open AppDelegate.m file and add the following function in the AppDelegate class. In the function, we have created an object of BlueshiftConfig class to set up the API key and the other SDK configuration. Initialise the Blueshift plugin using BlueshiftPluginManager class method initialisePluginWithConfig: autoIntegrate:. Pass the created config object and autoIntegrate as YES to opt-in for automatic integration.
- (void)initialiseBlueshiftWithLaunchOptions:(NSDictionary*)launchOptions {
  // Create config object
  BlueShiftConfig *config = [[BlueShiftConfig alloc] init];

  // Set Blueshift API key to SDK
  config.apiKey = @"API KEY";

  // Set launch options to track the push click from killed app state
  config.applicationLaunchOptions = launchOptions;

  // Delay push permission dialog by setting NO, by default push permission dialog is displayed on app launch.
  config.enablePushNotification = YES;

  // Set userNotificationDelegate to self to get the push notification callbacks.
  config.userNotificationDelegate = self;

  // Initialise the Plugin and SDK using the Automatic integration.
  [[BlueshiftPluginManager sharedInstance] initialisePluginWithConfig:config autoIntegrate:YES];
}
- Now call the function that you added in the
application:(UIApplication *)application didFinishLaunchingWithOptions:(NSDictionary *)launchOptionsmethod of theAppDelegateclass.
The AppDelegate.m file should look like this:
- (BOOL)application:(UIApplication *)application didFinishLaunchingWithOptions:(NSDictionary *)launchOptions
{

  /*
  //   React Native initialisation code.
  //
  */

  // Initialise the Plugin & SDK by calling the `initialiseBlueshiftWithLaunchOptions` method before the return statement.
  [self initialiseBlueshiftWithLaunchOptions:launchOptions];

  return YES;
}
SDK config values
The following optional SDK config values can be used to configure the SDK:
// Optional:  Set Blueshift Region US or EU, default region will be the US if not set.
 [config setRegion:BlueshiftRegionEU];

  // Optional: Set AppGroupId only if you are using the Carousel push notifications.
 [config setAppGroupID:@"Your App Group ID here"];

  // Optional: Set custom authorization options
  [config setCustomAuthorizationOptions: UNAuthorizationOptionAlert| UNAuthorizationOptionSound| UNAuthorizationOptionBadge| UNAuthorizationStatusProvisional];

  // Optional: Set App's push notification custom categories, SDK will register them
  [config setCustomCategories: [self getCustomeCategories]];

 // Optional: Set Batch upload interval in seconds.
 // If you do not add the below line, SDK by default sets it to 300 seconds.
 [[BlueShiftBatchUploadConfig sharedInstance] setBatchUploadTimer:60.0];

  // Optional: Set device Id type, SDK uses IDFV by default if you do not
  // Add below line of code. For more information, see:
  //https://developer.blueshift.com/docs/include-configure-initialize-the-ios-sdk-in-the-app#specify-the-device-id-source
 [config setBlueshiftDeviceIdSource: BlueshiftDeviceIdSourceUUID];

 // Optional: Change the SDK core data files location only if needed. The default location is the Document directory.
 [config setSdkCoreDataFilesLocation:BlueshiftFilesLocationLibraryDirectory];

 //Optional: Set debug true to see Blueshift SDK info and API logs, by default it's set as false.
 #ifdef DEBUG
 	[config setDebug:YES];
#endif
You can find more information on the SDK config values here.
The SDK setup with automatic integration is complete. Using this setup, you will be able to send events to Blueshift and send basic push notifications (title + content) to iOS devices. You will also get the push notification deep links in your React app using the event url.
For more information, see enable Rich push notifications, enable in-app notifications, and enable Blueshift email deep links.
Manual integration
You must follow the previous steps to create the Blueshift Config and then initialise the plugin by passing autoIntegrate as NO.
[[BlueshiftPluginManager sharedInstance] initialisePluginWithConfig:config autoIntegrate:NO];
To integrate the Blueshift SDK manually to handle push notifications and deep link callbacks, complete the following steps:
Configure AppDelegate for push notifications
Add the following to the AppDelegate.m file of your app’s Xcode project to support the push notifications. See Configure App delegate for push notifications for more information.
#pragma mark - remote notification delegate methods
- (void)application:(UIApplication *)application didRegisterForRemoteNotificationsWithDeviceToken:(nonnull NSData *)deviceToken {
    [[BlueShift sharedInstance].appDelegate registerForRemoteNotification:deviceToken];
}

- (void)application:(UIApplication*)application didFailToRegisterForRemoteNotificationsWithError:(NSError*)error {
    [[BlueShift sharedInstance].appDelegate failedToRegisterForRemoteNotificationWithError:error];
}

- (void)application:(UIApplication *)application didReceiveRemoteNotification:(NSDictionary *)userInfo fetchCompletionHandler:(void (^)(UIBackgroundFetchResult result))handler {
  if([[BlueShift sharedInstance]isBlueshiftPushNotification:userInfo] == YES) {
    [[BlueShift sharedInstance].appDelegate handleRemoteNotification:userInfo forApplication:application fetchCompletionHandler:handler];
  } else {
    //Handle Notifications other than Blueshift and call the handler with FetchResult based on your custom usecase.
    handler(UIBackgroundFetchResultNoData);
  }
}

#pragma mark - UserNotificationCenter delegate methods
-(void)userNotificationCenter:(UNUserNotificationCenter *)center willPresentNotification:(UNNotification *)notification withCompletionHandler:(void (^)(UNNotificationPresentationOptions options))completionHandler{
  NSDictionary* userInfo = notification.request.content.userInfo;
  if([[BlueShift sharedInstance]isBlueshiftPushNotification:userInfo]) {
    [[BlueShift sharedInstance].userNotificationDelegate handleUserNotificationCenter:center willPresentNotification:notification withCompletionHandler:completionHandler];
  } else {
        //Handle Notifications other than Blueshift and call the handler with your app specific Notification Presentation options
        completionHandler(UNNotificationPresentationOptionAlert | UNNotificationPresentationOptionBadge | UNNotificationPresentationOptionSound);
  }
}

- (void)userNotificationCenter:(UNUserNotificationCenter *)center didReceiveNotificationResponse:(UNNotificationResponse *)response withCompletionHandler:(void (^)(void))completionHandler {
  NSDictionary* userInfo = response.notification.request.content.userInfo;

  // Optional : Call Plugin method to send the push notification payload to react-native under event `PushNotificationClickedEvent`.
  [[BlueshiftPluginManager sharedInstance] sendPushNotificationDataToRN:userInfo];

  if([[BlueShift sharedInstance]isBlueshiftPushNotification:userInfo]) {
  // Call Blueshift method to handle the push notification click
    [[BlueShift sharedInstance].userNotificationDelegate handleUserNotification:center didReceiveNotificationResponse:response withCompletionHandler:completionHandler];
  } else {
    //Handle Notifications other than Blueshift and call the handler
    completionHandler();
  }
}
Handle the push and in-app deep links manually
The Blueshift iOS SDK supports deep links on push notifications and in-app messages. If a deep-link URL is present in the push or in-app message payload, the Blueshift SDK triggers AppDelegate class application:openURL:options: method on notification click/tap action and delivers the deep link there.
/// Override the open url method for handling deep links
 - (BOOL)application:(UIApplication *)application openURL:(NSURL *)url options:(NSDictionary<UIApplicationOpenURLOptionsKey,id> *)options { // Check if the received link is from Blueshift, then pass it to Blueshift plugin to handle it.
  if ([[BlueshiftPluginManager sharedInstance] isBlueshiftOpenURLLink:url options:options] == YES) {
    return [[BlueshiftPluginManager sharedInstance] application:application openURL:url options:options];
  } else {// If the link is not from Blueshift, write custom logic to handled it in your own way.
    // Write code to handle the other urls
  }
  return YES;
 }
In the case of Automatic integration, the plugin handles deep links for push and in-app. You can always override this functionality by manually implementing the method mentioned above.
2. Enable rich push notifications
Blueshift supports Image and carousel-based push notifications.
-
Support Rich image-based push notifications - you must add the
Notification service extensionto your project and integrate theBlueshift-iOS-Extension-SDK. Follow the step-by-step guide to enable Rich image push notifications. -
Support Carousel push notifications - You must integrate the
Notification service extensionas mentioned above, and then addNotification content extension. Follow the step-by-stepstep-by-step guide to enable carousel push notifications.
Ensure that you set the App group ID to SDK. It is mandatory to set the app group ID when you use carousel push notifications. See Add an app group to create and set up an app group ID in your project.
3. Enable in-app messages
By default, In-app messages are disabled in the SDK. You must explicitly enable it in the Blueshift config.
Enable in-app messages from Blueshift config
During the SDK initialisation in AppDelegate.m file, we have set the values in the config. To enable in-app messages from Blueshift iOS SDK, you must set enableInAppNotification property of config to YES.
[config setEnableInAppNotification:YES];
Configure time intervals between two in-apps
By default, the time interval between two in-app messages (the time between when a message is dismissed and the next message appears) is 1 minute. You can use the following method to change this interval during the SDK initialization in the AppDelegate.m file:
// Set time interval in seconds
[config setBlueshiftInAppNotificationTimeInterval:30];
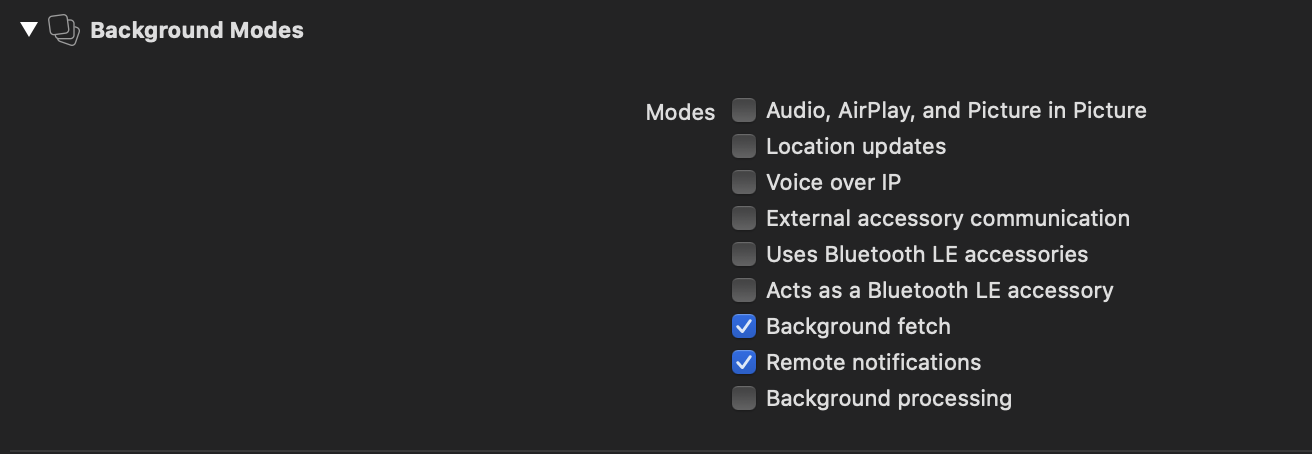
Enable background modes
We highly recommend enabling Background fetch and Remote notifications background modes from the Signing & Capabilities. This enables the app to fetch in-app messages when it is in the background.
Register screens for in-app messages
Once you enable in-app messages, you must register the React Native screens to receive them. You can register the screens in the following two ways.
- Register all screens in the Xcode project to receive in-app messages.
You must addregisterForInAppMessageline in theAppDelegate.mfile immediately after the SDK initialisation line, irrespective of automatic or manual integration. See the following code snippet for reference.
[[BlueshiftPluginManager sharedInstance] initialisePluginWithConfig:config autoIntegrate:YES];
[[BlueShift sharedInstance] registerForInAppMessage:@"ReactNative"];
- Register and unregister each screen of your react native project for in-app messages. If you don’t register a screen for in-app messages, the in-app messages stop showing up for screens that are not registered. You must add in-app registration and unregistration code on the
componentDidMountandcomponentWillUnmountrespectively inside your react native screens. See the following code snippet for reference.
componentDidMount() {
    // Register for in-app notification
    Blueshift.registerForInAppMessage("HomeScreen");
  }

 componentWillUnmount() {
    // Unregister for in-app notification
    Blueshift.unregisterForInAppMessage();
 }
Enable mobile inbox
Since the mobile inbox stores in-app notifications for later use, you need to enable and set up in-app notifications first. Once that is done, you can enable the mobile inbox in the SDK config during SDK initialization.
config.enableMobileInbox = true
config.enableMobileInbox = YES;Now that the Inbox is enabled via the SDK, you can use the Blueshift plugin inbox widget to display the inbox in your app, as shown here.
4. Enable Blueshift email deep links
Blueshift’s deep links are usually HTTPS URLs that take users to a page in the app or launch from within a browser. If an email or text message we send as part of the campaign contains a Blueshift deep link, and a user clicks it, iOS will launch the installed app, and the Blueshift SDK will deliver the deep link to the app so the app can navigate the user to the corresponding screen.
-
Complete the CNAME and AASA configuration as mentioned in the
Prerequisitessection of Integrate Blueshift's deep links. -
Add associated domains to your Xcode project as mentioned in the
Integrationsection of Integrate Blueshift's deep links. -
To enable Blueshift deep links from the SDK, complete the following steps:
Implement protocol BlueshiftUniversalLinksDelegate on the AppDelegate class to get the deep links callbacks from the SDK. Your AppDelegate.h file should look like this:
#import "BlueshiftPluginManager.h"

@interface AppDelegate : UIResponder <UIApplicationDelegate,BlueshiftUniversalLinksDelegate, UNUserNotificationCenterDelegate, RCTBridgeDelegate>

@property (nonatomic, strong) UIWindow *window;

@end
Now set the blueshiftUniversalLinksDelegate config variable to self to enable the Blueshift deep links during the Blueshift plugin initialisation in AppDelegate.m file.
// If you want to use the Blueshift universal links, then set as follows.
config.blueshiftUniversalLinksDelegate = self;
Automatic integration
If you have integrated the plugin and SDK using the automatic integration, your setup is completed here. You will receive the deep link on the react-native using the event url.
Manual integration
If you have opted for Manual integration, you must complete the following steps to integrate the Blueshift plugin.
Configure the continueUserActivity method
Pass the URL/activity from the continueUserActivity method to the plugin, so that the plugin can process the URL and perform the click tracking. After processing the URL, the SDK sends the original URL in the BlueshiftUniversalLinksDelegate method.
// Override the `application:continueUserActivity:` method for handling the universal links
- (BOOL)application:(UIApplication *)application continueUserActivity:(nonnull NSUserActivity *)userActivity
 restorationHandler:(nonnull void (^)(NSArray<id<UIUserActivityRestoring>> * _Nullable))restorationHandler {
   // Check if the received URL is Blueshift universal link URL, then pass it to Blueshift plugin to handle it.
  if ([[BlueshiftPluginManager sharedInstance] isBlueshiftUniversalLink:userActivity] == YES) {
    return  [[BlueshiftPluginManager sharedInstance] application:application continueUserActivity:userActivity restorationHandler:restorationHandler];
  } else { // If the link is not from Blueshift, write custom logic to handled it in your own way.
    // Write code to handle the other urls
  }
  return YES;
 }
In the case of automatic integration, the plugin handles email deep links. You can always override this functionality by manually implementing the method.
Implement BlueshiftUniversalLinksDelegate
Now, implement the BlueshiftUniversalLinksDelegate delegate methods to get the success and failure callbacks. BlueshiftPluginManager will take care of delivering this deep link under the event url to the react native.
// Deep link processing success callback
- (void)didCompleteLinkProcessing:(NSURL *)url {
  if (url) {
    [[BlueshiftPluginManager sharedInstance] application:UIApplication.sharedApplication openURL:url options:@{}];
  }
}

// Deep link processing failure callback
- (void)didFailLinkProcessingWithError:(NSError *)error url:(NSURL *)url {
  if (url) {
    [[BlueshiftPluginManager sharedInstance] application:UIApplication.sharedApplication openURL:url options:@{}];
  }
}
See the Troubleshooting section for any integration issues.
Blueshift React Native plugin with Swift
Since Blueshift’s SDK is built in Objective-C, you’ll need to add a bridging header to use it in a Swift project. Follow the steps below to add the bridging header.
Add the bridging header
- In Xcode, open your iOS project.
- Go to: File → New → File → Header File
- Name it:
YourAppName-Bridging-Header.hfor example:MySwiftSampleApp-Bridging-Header.h - Import the Blueshift React Native plugin header files into the newly created header file:
#import "BlueshiftPluginManager.h"
So the bridging header file would look like:
#ifndef MySwiftSampleApp_Bridging_Header_h
#define MySwiftSampleApp_Bridging_Header_h
#import "BlueshiftPluginManager.h"
#endif /* MySwiftSampleApp_Bridging_Header_h */
- Go to Build Settings → Swift Compiler - General → Objective-C Bridging Header and set the path (relative to your project/.xcodeproj file) for the bridging header in the debug and release sections. For example, if the file is at the root of the project, use the file name directly:
MySwiftSampleApp-Bridging-Header.h
SDK initialization Swift code
initialiseBlueshiftWithLaunchOptions(launchOptions: launchOptions)

func initialiseBlueshiftWithLaunchOptions(launchOptions: [UIApplication.LaunchOptionsKey: Any]?) {
  // Create config object
  var config = BlueShiftConfig()

  // Set Blueshift API key to SDK
  config.apiKey = "API KEY"

  // Set launch options to track the push click from killed app state
  config.applicationLaunchOptions = launchOptions ?? [:]

  // Delay push permission dialog by setting NO, by default push permission dialog is displayed on app launch.
  config.enablePushNotification = true

  // Set userNotificationDelegate to self to get the push notification callbacks.
  config.userNotificationDelegate = self

  // Initialise the Plugin and SDK using the Automatic integration.
  BlueshiftPluginManager.sharedInstance()?.initialisePlugin(with: config, autoIntegrate: true)
}
The automatic setup ends here.
Manual integration code snippets
Push notification delegates setup
extension AppDelegate {
  func application(
    _ application: UIApplication, didRegisterForRemoteNotificationsWithDeviceToken deviceToken: Data
  ) {
    BlueShift.sharedInstance()?.appDelegate?.register(forRemoteNotification: deviceToken)
  }

  func application(
    _ application: UIApplication, didFailToRegisterForRemoteNotificationsWithError error: Error
  ) {
    BlueShift.sharedInstance()?.appDelegate?.failedToRegisterForRemoteNotificationWithError(error)
  }

  func application(
    _ application: UIApplication, didReceiveRemoteNotification userInfo: [AnyHashable: Any],
    fetchCompletionHandler completionHandler: @escaping (UIBackgroundFetchResult) -> Void
  ) {
    BlueShift.sharedInstance()?.appDelegate?.handleRemoteNotification(
      userInfo, for: application, fetchCompletionHandler: completionHandler)
  }
}
Configure UserNotificationCenter
extension AppDelegate: UNUserNotificationCenterDelegate {
  func userNotificationCenter(
    _ center: UNUserNotificationCenter, didReceive response: UNNotificationResponse,
    withCompletionHandler completionHandler: @escaping () -> Void
  ) {
    BlueShift.sharedInstance()?.userNotificationDelegate?.handleUserNotification(
      center, didReceive: response, withCompletionHandler: completionHandler)
  }

  func userNotificationCenter(
    _ center: UNUserNotificationCenter, willPresent notification: UNNotification,
    withCompletionHandler completionHandler: @escaping (UNNotificationPresentationOptions) -> Void
  ) {
    BlueShift.sharedInstance()?.userNotificationDelegate?.handle(
      center, willPresent: notification, withCompletionHandler: completionHandler)
  }
}
Deep links
func application(
  _ app: UIApplication, open url: URL, options: [UIApplication.OpenURLOptionsKey: Any] = [:]
) -> Bool {
  if BlueshiftPluginManager.sharedInstance()?.isBlueshiftOpenURLLink(url, options: options) == true
  {
    return BlueshiftPluginManager.sharedInstance()?.application(app, open: url, options: options)
      ?? true
  } else {
    // Write code to handle the other urls
  }
  return true
}
In-app messages
//Enable In-App messages from Blueshift Config
config.enableInAppNotification = true

//Configure time intervals between two in-apps
config.blueshiftInAppNotificationTimeInterval = 30

//Register all screens
BlueshiftPluginManager.sharedInstance()?.initialisePlugin(with: config, autoIntegrate: true)
BlueShift.sharedInstance()?.registerFor(inAppMessage: "ReactNative")
Universal links
// enable in config
config.blueshiftUniversalLinksDelegate = self

// Manual integration code - Configure continueUserActivity method
extension AppDelegate: BlueshiftUniversalLinksDelegate {
  func application(
    _ application: UIApplication, continue userActivity: NSUserActivity,
    restorationHandler: @escaping ([UIUserActivityRestoring]?) -> Void
  ) -> Bool {
    if BlueshiftPluginManager.sharedInstance()?.isBlueshiftUniversalLink(userActivity) == true {
      BlueshiftPluginManager.sharedInstance()?.application(
        application, continue: userActivity, restorationHandler: restorationHandler)
    } else {
      // handle existing Universal links or Universal Links other than Blueshift
    }
    return true
  }

  //Universal link will be received here on successful processing
  func didCompleteLinkProcessing(_ url: URL?) {
    if let url {
      BlueshiftPluginManager.sharedInstance()?.application(
        UIApplication.shared, open: url, options: [:])
    }
  }

  //Error will be received here with unprocessed url on unsuccessful processing
  func didFailLinkProcessingWithError(_ error: Error?, url: URL?) {
    if let url {
      BlueshiftPluginManager.sharedInstance()?.application(
        UIApplication.shared, open: url, options: [:])
    }
  }
}
Updated 9 months ago