Set up mobile inbox
This article provides steps for setting up the mobile inbox for in-app messages in your iOS app.
A mobile inbox contains the in-app messages that are directly delivered to the inbox in a non-intrusive way or that are displayed in the app and also delivered to the inbox. Users will see the messages in the inbox until the message expires or until they delete them after reading.
Blueshift’s SDK automatically syncs the mobile inbox, along with the message status (read/unread), across all the devices on which a user has installed your app and has logged in.
The SDK provides a default user interface for the mobile inbox. You can customize the UI to match your brand style and colors.
Your app must use Blueshift’s iOS SDK version 2.4.0 and above to save in-app messages to an inbox.
For more information about sending in-app messages to the mobile inbox, see the In-app Studio documentation.
Prerequisites
To ensure proper functioning of the inbox and retrieval of the correct messages, you must complete the following prerequisites.
Enable mobile inbox
As Mobile Inbox stores the in-app messages for later use, you need to enable and set up the in-app messages first. Once that is done, you can enable the mobile inbox using the BlueShiftConfig at the time of SDK initialization.
Add the below code to your SDK initialization code to enable mobile inbox. Setting enableMobileInbox flag to true, force enables the in-app notifications in case they are not enabled.
config.enableMobileInbox = trueSet Device ID type
We recommend that you to use the device id type “UUID” during the SDK initialization. This device ID type supports device ID reset functionality. Find more about UUIDdevice id type here.
Set user information
You must set the email ID or the customer ID or both at the time of log in to Blueshift SDK. These user identifiers help the SDK to fetch messages from the server and show them in the Inbox after a user logs in. If you don't set this user information to the SDK, then showing existing inbox messages might fail for new app installs. Check this section to set the user info.
Handle user logout
In order to maintain the logout state of the user, you will need to reset/clear the information associated with the logged-out user.
Reset saved user information
On log out, ensure that you remove the saved user information to the SDK, so that you can set new user information on the next log in. Refer this document to reset the saved user info.
Reset device ID
We recommend that you reset the SDK device ID on user log out from the app. This forces the SDK to create a new device ID which will be used for the log out activity and the subsequent login activity, if any. Resetting the device ID ensures that the inbox history is maintained properly per user.
For more information, see Reset device ID.
Delete cached inbox messages
SDK caches the inbox notifications for offline use. When a user logs out, you might want to clear the cached inbox notifications to avoid unread in-app type inbox notifications getting shown in the logged-out mode.
You can clear the inbox notifications as:
//Delete all the cahced inbox notifications
InAppNotificationEntity.eraseEntityData()
Calling this method will only delete the cached inbox notifications from the device. It will not delete any inbox notifications associated with the user from the server.
Show the mobile inbox in your app
To display the mobile inbox in your app, use one of the following two classes included in Blueshift’s iOS SDK:
BlueshiftInboxViewControllerBlueshiftInboxNavigationViewController
We recommend that you use the BlueshiftInboxNavigationViewController class as this class provides a built-in navigation controller, and it can also be used to show a deep linked screen in the same navigation flow.
NoteWe recommend that you show the inbox only in the logged in mode and not in the guest mode.
The mobile inbox can be displayed in the following two ways:
As a screen
Add an inbox screen using either code or a storyboard.
- Use code similar to the following sample code:
//Using BlueshiftInboxViewController
let inboxVC = BlueshiftInboxViewController()
navigationController?.show(inboxVC, sender: nil)

//Using BlueshiftInboxNavigationViewController
let navController = BlueshiftInboxNavigationViewController()
present(navController, animated:true, completion: nil)- Add the inbox screen using the storyboard by completing the following steps:
- Open the storyboard and add a View Controller from the Library.
- Go to Identity Inspector and set the class to
BlueshiftInboxViewControllerorBlueshiftInboxNavigationViewControllerbased on your use case. - Launch this screen using segue or any other mechanism wherever you want to show the inbox.
As a tab on a UITTabBarController
Configure a tab to load an BlueshiftInboxNavigationViewController using either code or a storyboard.
- Use code similar to the following sample code:
let navController = BlueshiftInboxNavigationViewController()
present(navController, animated:true, completion: nil)- Add the inbox screen for tab bar using the storyboard by completing the following steps:
- Open storyboard and add a View Controller from the Library.
- Go to Identity Inspector and set the class to
BlueshiftInboxNavigationViewController. - Create a segue with relation as view controllers from the tab bar controller.
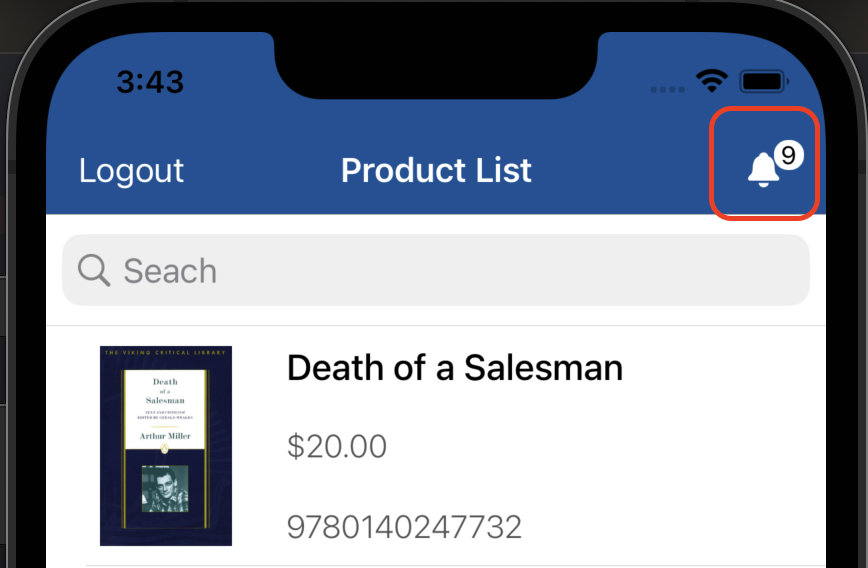
Get unread message count
The SDK provides an API/function which you can use to get the count for unread messages in the inbox. You can then display this count on the badge.
Blueshift's SDK broadcasts a notification when the unread messages count changes. The unread message count changes when:
- A new unread message is received.
- A message is read by the user.
- A message is deleted by the user or by the SDK (when the SDK syncs the messages with the server).
To get the count for unread messages, use the following code. The callback handler will be invoked by the SDK on the main thread so that you can perform the UI updates there.
    BlueshiftInboxManager.getInboxUnreadMessagesCount({ status, count in
	// set the badge to the label
        lblBadge?.text = "\(count)"
    })
Add an observer for observer name BlueshiftInboxUnreadMessageCountDidChange to listen to the notification, and update the label count from there. If you are adding the observer in the View Controller, ensure that you add the observer in the viewWillAppear and remove it on viewWillDisappear. This is to avoid adding duplicate observers.
//declare a variable to hold the token to remove the observer
    var token: NSObjectProtocol?

override func viewWillAppear(_ animated: Bool) {
        super.viewWillAppear(animated)
        //fetch and set initial badge count
        BlueshiftInboxManager.getInboxUnreadMessagesCount({ status, count in
            self.lblBadge?.text = "\(count)"
        })

        //Add observer to refersh badge count when on inbox data changes
        token = NotificationCenter.default.addObserver(forName: NSNotification.Name(kBSInboxUnreadMessageCountDidChange), object: nil, queue: OperationQueue.current) { Notification in
            BlueshiftInboxManager.getInboxUnreadMessagesCount({ status, count in
                self.lblBadge?.text = "\(count)"
            })
        }
    }

override func viewWillDisappear(_ animated: Bool) {
        super.viewWillDisappear(animated)
// Remove the observer
        NotificationCenter.default.removeObserver(token!)
    }
Handle deep links
When the customer clicks any of the links in an in-app notification displayed in the inbox, the associated deep link will be delivered to the application(_ app: open url: options: ) method of the AppDelegate class. This is the default behaviour for the inbox in-app deep links. As this is the default deep link delivery mechanism used by the SDK for push, in-app, and inbox messages, check this section to distinguish between push, in-app, and inbox deep links.
You can override this behaviour to handle the deep links in the custom delegate class to get better control over handling it.
InfoThe basic configuration for the mobile inbox is now completed. Using this basic configuration, you will be able to see the inbox screen and see the messages inside it, if any were received.
You can check out our Blueshift Inbox sample project on GitHub, which showcases various ways to create an Inbox UI in your application.
Customize the mobile inbox
You can customize the user interface of the mobile inbox to match your app design.
NoteTo customize the inbox, we recommend delegation and custom table cells over inheriting from the mobile inbox view controller classes.
Modify cell layout, colors and font
You can modify the font, color, and layout of the inbox table view cells to match the design of your app.
To modify the look of the inbox, complete the following steps:
- Create a class for the custom table view cell. The table view cell class needs to inherit SDK's
BlueshiftInboxTableViewCell. For example, we create a classCustomInboxTableViewCell.
import BlueShift_iOS_SDK

class CustomInboxTableViewCell: BlueshiftInboxTableViewCell {
    override func awakeFromNib() {
        super.awakeFromNib()
        // Initialization code
    }

    override func setSelected(_ selected: Bool, animated: Bool) {
        super.setSelected(selected, animated: animated)

        // Configure the view for the selected state
    }

}- Now copy
Blueshift-iOS-SDK/Inbox/BlueshiftInboxTableViewCell.xibfrom theBlueshift-iOS-SDKrepository to your project. - Rename the file and give the same name as your table view cell class name,
CustomInboxTableViewCell.xib. - In the new file, change the layout, colors, and font as required.
- Now go to Identity Inspector and set the class for xib to the table view class name which is
CustomInboxTableViewCell.
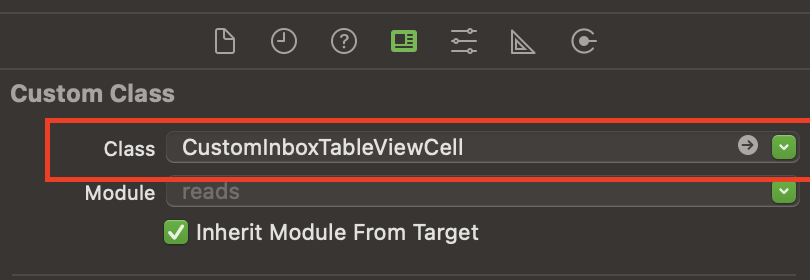
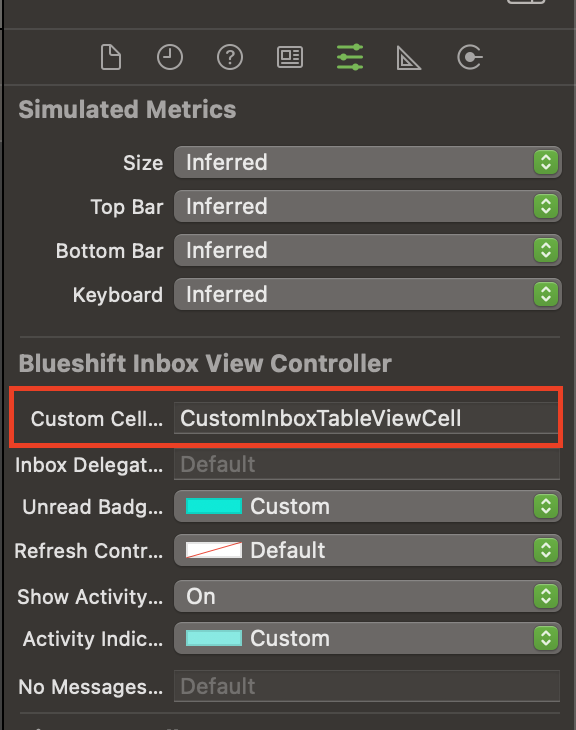
- Tell the mobile inbox view controller to use the custom nib file:
- If you are using a storyboard, select the BlueshiftInboxViewController, open Attributes inspector, and set the Custom Cell Nib Name property to your custom cell nib filename.
For example:
- Otherwise, set the customCellNibName property on the
BlueshiftInboxViewControllerorBlueshiftInboxNavigationViewControllerto the name of your custom cell.
For example:
let navController = BlueshiftInboxNavigationViewController()
navController.customCellNibName = "CustomInboxTableViewCell"
present(navController, animated:true, completion: nil)
Create a custom delegate for the mobile inbox
You can use a delegate for both BlueshiftInboxViewController and BlueshiftInboxNavigationViewController to customize your mobile inbox in the following ways:
- Display the date in a specific format
- Filter messages
- Sort messages
- Set up a custom UI for particular messages
- Override default handling of deep links
To create a custom delegate, complete the following steps:
- Create a class that implements the
BlueshiftInboxViewControllerDelegateprotocol. For example, you can call itCustomInboxTableViewCellDelegate. - Provide implementations for the parts of the protocol that correspond to the customizations you want to make. It is not necessary to implement the entire protocol.
- Instantiate and set up the delegate.
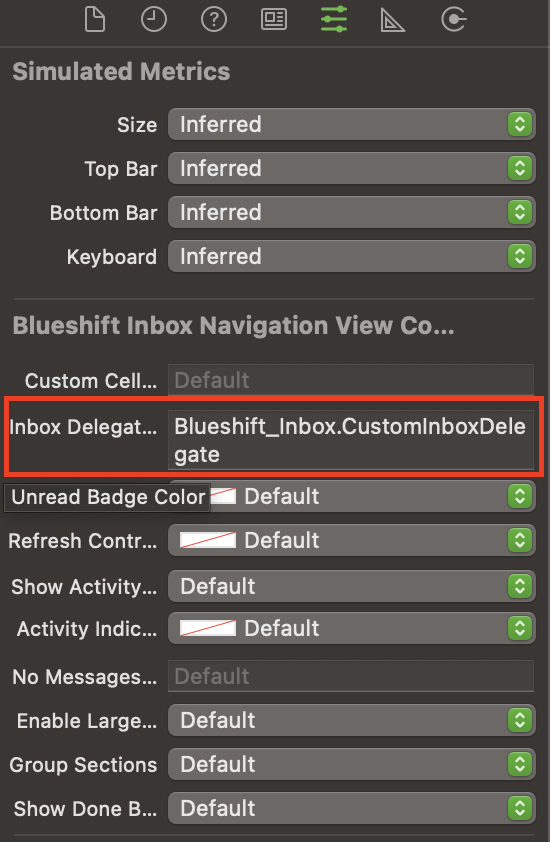
- If you are showing inbox using a storyboard:
Use the attribute inspector to set the Inbox Delegate Name attribute for the view controller to <YOUR_MODULE_NAME>.<YOUR_CUSTOM_DELEGATE_CLASS_NAME>
In this example, the module name isBlueshift_Inboxand the delegate class name isCustomInboxDelegate, so you must set the value asBlueshift_Inbox.CustomInboxDelegate.
IMPORTANTDo not forget to add the module name while setting the inbox delegate name using storyboard.
- If you are showing inbox using code:
Set the view controller'sinboxDelegateproperty to an instance of the custom delegate class.
In the following example, the code sets the delegate to an object of typeCustomInboxDelegate:
//Using BlueshiftInboxViewController
let inboxVC = BlueshiftInboxViewController(inboxDelegate: CustomInboxDelegate())
navigationController?.show(inboxVC, sender: nil)

//Using BlueshiftInboxNavigationViewController
let navController = BlueshiftInboxNavigationViewController()
navController.inboxDelegate = CustomInboxDelegate()
present(navController, animated:true, completion: nil)
Set date format and visibility
Use the formatDate(message:) function of the mobile inbox delegate to change the date format for the message or to hide the date. This method gets BlueshiftInboxMessage as param and returns an optional string which is the custom formatted date.
- To hide the date field in the inbox cell, return
nilfrom theformatDate(message:)function. - Return a custom-formatted date string based on your use case.
The following example show's how to use date formatter to format the date:
Public class MobileInboxDelegate: NSObject, BlueshiftInboxViewControllerDelegate {

 public func formatDate(\_ message: BlueshiftInboxMessage) -> String? {
        guard let createdAt = message.createdAtDate else {
            return nil
        }
            let dateFormatter = DateFormatter()
            dateFormatter.dateFormat = "MM-dd-yyyy hh:mm aa"
            return dateFormatter.string(from: createdAt)
    }

}
Filter messages
To decide which messages are displayed in the mobile inbox, set the messageFilter property on the mobile inbox delegate. This property is a closure that takes a BlueshiftInboxMessage and returns a Bool.
- Return
trueto display the message. - Return
falseif the message should not be displayed.
The following example shows how a filter can be used to show only unread in-app messages inside the inbox:
public class MessageFilterInboxDelgate: NSObject, BlueshiftInboxViewControllerDelegate {
    // Filter to show only Unread messages
    public var messageFilter: ((BlueshiftInboxMessage) -> Bool)? = { message in
        return !message.readStatus
    }
}
Sort messages in the inbox
By default, the messages in the mobile inbox are sorted in descending order based on the date, with the newest message at the top. You can also sort messages in other ways. For example, in ascending order based on the message title or based on read status of the message to show unread messages on the top.
To sort the messages in the mobile inbox, set the messageComparator property on the mobile inbox delegate. This property is a closure that takes two BlueshiftInboxMessage values and returns a Bool. It returns true if the first message should appear before the second message, and false otherwise.
The following example for messageComparator shows how to sort messages to show unread messages at the top followed by read messages:
public class MessageSortInboxDelegate: NSObject, BlueshiftInboxViewControllerDelegate {
    public var messageComparator: ((BlueshiftInboxMessage, BlueshiftInboxMessage) -> ComparisonResult)? = {msg1, msg2 in
            if msg1.readStatus && !msg2.readStatus {
                return .orderedDescending
            } else {
                return .orderedAscending
            }
      }
}
Implement multiple cell layout
You can display different inbox items with different styles so users can easily distinguish between two messages.
For example, display messages with alternating white and black backgrounds or design the inbox UI for the dark and light modes.
To display different inbox items with different interfaces, make the following two configuration changes to the mobile inbox delegate:
- Follow steps 1 to 5 from thissection to create multiple custom table view cells.
- Set the
customCellNibNamesproperty to an array of created custom cell nib file names. - Implement method
getCustomCellNibName(for message:)to return the custom nib name for the givenBlueshiftInboxMessage:- To use the default layout, return
nil. - To use a custom layout, return the nib file name.
- To use the default layout, return
In the following example, the code sets the customCellNibNames array for custom dark mode and light mode cells and then uses a getCustomCellNibName(for message:) provided by Blueshift’s iOS SDK, which tells the SDK to select the custom cell name based on the given BlueshiftInboxTableViewCel.l:
public class MultipleCellsInboxDelegate: NSObject, BlueshiftInboxViewControllerDelegate {
    public var customCellNibNames: [String]? = ["DarkModeTableViewCell", "LightModeTableViewCell"]

   public func getCustomCellNibName(for message: BlueshiftInboxMessage) -> String? {
       if UIScreen.main.traitCollection.userInterfaceStyle == .dark {
           return "DarkModeTableViewCell"
       } else {
           return "LightModeTableViewCell"
       }
   }
}
Override default handling of deep links
By default, the deep link is delivered to the application(_ app: open url: options: ) method of the AppDelegate class. You can override this default behaviour by implementing method inboxNotificationActionTapped(withDeepLink deepLink: inboxViewController inboxVC: options:). After implementing this method, the SDK will deliver the deep link to inboxNotificationActionTapped method instead of application(_ app: open url: options:).
ImportantThe SDK only delivers the deep link associated with the in-app notification action. The host application must complete further processing and navigate to the correct screen.
In the following example, the deep link is processed to get the product, and the product detail screen is displayed in the navigation controller of the InboxViewController. The following example can work for inbox presented using both BlueshiftInboxViewController & BlueshiftInboxNavigationViewController.
public func inboxNotificationActionTapped(withDeepLink deepLink: String?, inboxViewController inboxVC: BlueshiftInboxViewController?, options: [String : Any] = [:]) {
//Find product for deep link to show the product details screen
        if let product = Utils.shared?.getProductForURL(url: deepLink ?? "")?.first, let navController = inboxVC?.navigationController {
		//If you find a valid product, then show it in the existing navigation stack
            Utils.shared?.showProductUsing(navigationController: navController, product: product, animated: true)
        } else {
            // If you dont find the product for deep link, handle it here if required.
        }
    }
Customize the inbox style
Using Blueshift's iOS SDK, you can easily customize certain styles for the mobile inbox.
The styling and customization for BlueshiftInboxViewController and BlueshiftInboxNavigationViewController is provided by the SDK and can be done using the storyboard’s attribute inspector or using code.
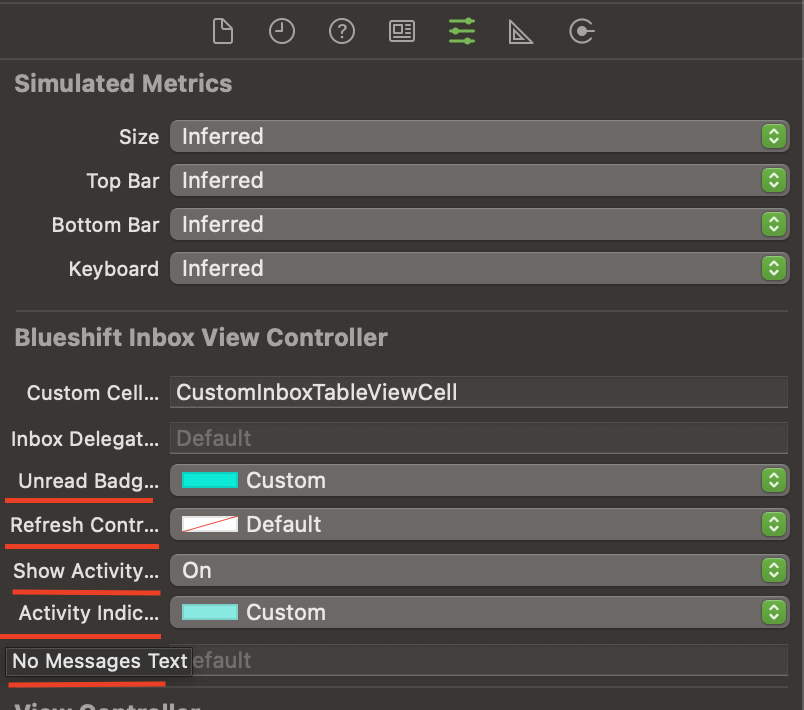
You can set the following styles for the mobile inbox:
- Unread badge color
- Refresh control color
- Show activity indicator
- Activity indicator color
- No messages text
Unread badge color
You can change the color for the unread messages badge based on your app theme. The default color set by the SDK is cyan.
 let inboxVC = BlueshiftInboxViewController()
 inboxVC.unreadBadgeColor = UIColor.purple
 navigationController?.show(inboxVC, sender: nil)
Alternately, you can also set the Unread Badge Color property for Inbox view controller in the Attributes Inspector using storyboard.
Refresh indicator color
By default, the SDK adds the pull to refresh to sync messages on the SDK’s Inbox screen. You can change the refresh control color based on your app theme. The default color set by the SDK is cyan.
let inboxVC = BlueshiftInboxViewController()
inboxVC.refreshControl?.tintColor = UIColor.red
navigationController?.show(inboxVC, sender: nil)
Alternately, you can also set the Refresh Control Color property for Inbox view controller in the Attributes Inspector using storyboard.
Show activity indicator
When displaying the in-app notifications, it might take some time to download the resources. While the download is in progress, by default, the SDK shows an activity indicator. This indicator is stopped automatically when the in-app message is displayed on the screen. You can set this value to false, if you don not want to display the activity indicator.
let inboxVC = BlueshiftInboxViewController()
inboxVC.showActivityIndicator = false
navigationController?.show(inboxVC, sender: nil)
Alternately, you can also set the Show Activity Indicator property for Inbox view controller in the Attributes Inspector using storyboard.
Activity indicator color
You can change the activity indicator color based on your app theme. The default color set by the SDK is cyan.
let inboxVC = BlueshiftInboxViewController()
inboxVC.activityIndicatorColor = UIColor.blue
navigationController?.show(inboxVC, sender: nil)
Alternately, you can also set the Activity Indicator Color property for Inbox view controller in the Attributes Inspector using storyboard.
No messages text
You can set the custom text that will be displayed in the mobile inbox when it is empty. By default, no text is displayed for an empty inbox. Setting this text can help your customers to understand the purpose of the mobile inbox.
When you add the message text, you can use the \n in the text to add new line.
let inboxVC = BlueshiftInboxViewController()
inboxVC.noMessagesText = "No messages availble \\n Come back later!"
navigationController?.show(inboxVC, sender: nil)
Alternately, you can also set the No Messages Text property for Inbox view controller in the Attributes Inspector using storyboard.
The following image shows how to use the storyboard to set the styles for the mobile inbox.
Additional styles using BlueshiftInboxNavigationViewController
The BlueshiftInboxNavigationViewController provides a few additional settings. You can also use the storyboard for these settings.
You can set the following styles for the mobile inbox:
- Enable large title
- Display the Done button
- Display the title
Enable large title
Set to true if you want to use a large title. By default this value is false.
let navController = BlueshiftInboxNavigationViewController()
navController.enableLargeTitle = true
present(navController, animated:true, completion: nil)
Alternately, you can also set the Enable Large Title property in Inbox view controller in the Attributes Inspector for the Blueshift Inbox Navigation View Controller using storyboard.
Display Done button
The SDK provides a ready to use Done button to the navigation controller in order to dismiss it. Set to true if you want to show the Done button. By default this value is false.
You can localize the text for the Done button by providing the text for the key BLUESHIFT_DONE_BUTTON in the localizable strings files. The SDK picks up this string and displays it.
let navController = BlueshiftInboxNavigationViewController()
navController.showDoneButton = true
present(navController, animated:true, completion: nil)
Alternately, you can also set the Show Done Button property the Attributes Inspector for the Blueshift Inbox Navigation View Controller using storyboard.
Title
By default, no title is set by the SDK for the inbox screen. To set the title using code, refer to the following code.
let navController = BlueshiftInboxNavigationViewController()
navController.title = "Mobile Inbox"
present(navController, animated:true, completion: nil)
Use the Title property from the Attributes inspector to set title for for the Blueshift Inbox Navigation View Controller using storyboard.
Group sections
Grouping of sections is added for future use.
The following image shows how to use the storyboard to set the styling for the BlueshiftInboxNavigationViewController.

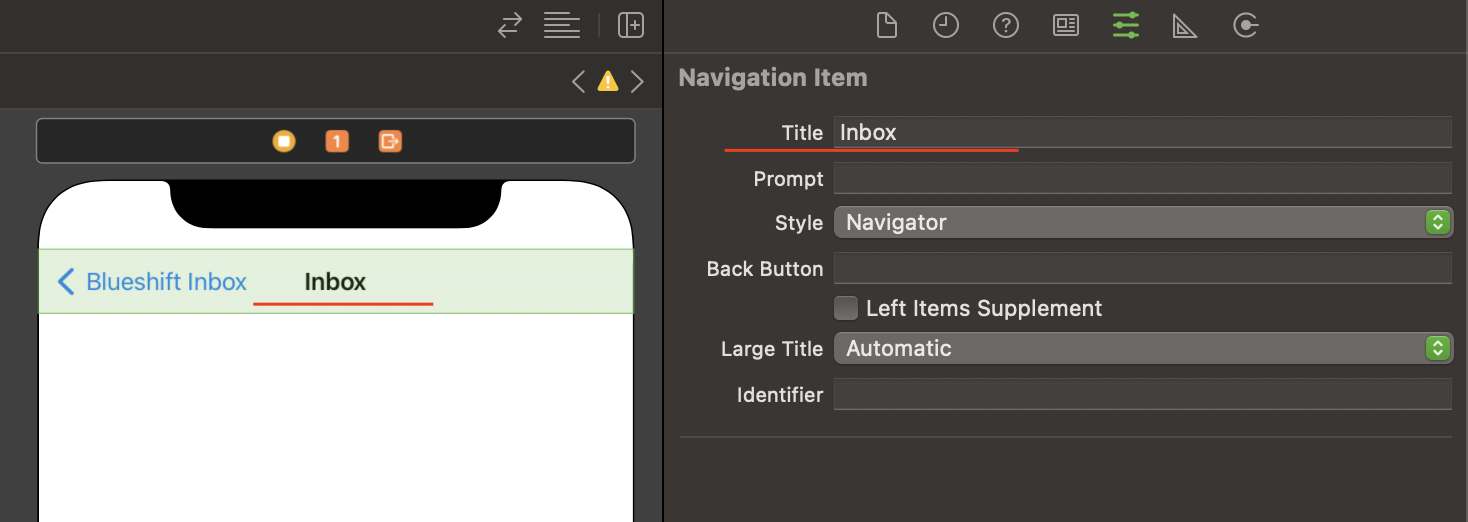
Set navigation title for BlueshiftInboxViewController
Use the Title property on BlueshiftInboxViewController to set the title for the inbox screen. By default, no title is set by the SDK for the inbox screen.
  let inboxVC = BlueshiftInboxViewController()
  inboxVC.title = "Mobile Inbox"
  navigationController?.show(inboxVC, sender: nil)
Alternately, you can also set the Title property by going to Navigation Item in the storyboard.
Delete action for the Blueshift Inbox
The delete action only works when an internet connection is available to delete a message from the server and sync the delete action on all the devices associated with the user. If a user tries to delete a message while offline, the SDK displays an alert message “Deleting message is not allowed when device is offline!” along with a OK button. Both the message and the button text can be customized by using localized strings.
- Use the key
BLUESHIFT_DEVICE_OFFLINE_ALERT_TITLEto provide the localized text for the alert message. - Use the key
BLUESHIFT_ALERT_OKAY_BUTTONto provide the localized text for the OK alert button.

Updated 10 months ago